assalam and hello readers!
lama x berblogging..
terkejut ble my fren asked me nape kau dh x update blog?
erkk...didn't know they read my blog..
well im actually have lotsa free time
but malas nk update..
mood swing maybe pembawakan budak..erk?
yes..im pregnant..4mnths pregnant..Alhamdulillah
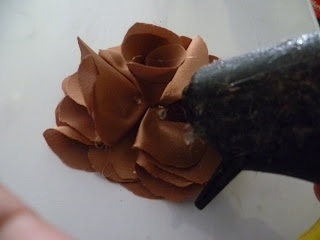
i've promised that ill update on the DIY flower corsage right
so here are the step:
1. potong kain in a square shape..
size depends on urself,
i forgot to snap a pic where i attach kertas yg i draw flower shape tu trace on the kain..
since im so lazy to cut piece by piece..
so i piled up a few pieces and potong skali gus...cepat dan mudah..
2. then take a piece of it and fold into half
3. then fold it again to half
4. use a glue gun and put some glue in a round shape (like pic below) on a piece of hard felt/cardboard/etc..
i used felt
5. put 1 petal like pic below..
for each corsage u need 9 petals

6. til u get this kind of layer..

7. for 2nd layer, put the petal in between 2 petals like pic below
8. and for the last petals which is on top of the 2nd layer, im sorry i forgot to take the pic..
after u fold to half, dun fold into another half, but roll it to get a cone shape, and for me i cut the bottom part of the cone shape (about 1/4 of the cone) so that its easier for me to attach it (like pic below)
9. lastly put some glue at every corner each of the 2nd layer petals, to stick it to the top petals..
10. tadaaa...my corsage are ready!
i didn't manage to do a lot..due to time constraint, its actually a last minute project..
and kain ni pun i used the leftover
owh btw, i used round shape pin for the corsage (sorry again no pic)
the cheapest i found is at bunga raya RM30 for 100...or RM3 for 10..
if im not mistaken..
for clearer explanation and view u may visit this link
thanx for reading!


tahniah awk, nk dpt baby...:)
ReplyDeletealamak..kiutnya corsage ni..senang je rupanya..anyway..tq for sharing
ReplyDelete